MIG: Difference between revisions

From HPCWIKI
Jump to navigation Jump to search
(Fix: remove --- horizontal lines (12 removed))
 
(5 intermediate revisions by 2 users not shown)
Line 1: Line 1:
== NVIDIA Multi-Instance GPU ==
= NVIDIA MIG (Multi-Instance GPU) =
NVIDIA introduced MIG(Multi-Instance GPU) since Ampere architecture in 2020.


If we use a single GPU to run more than one application, those applications compete on using GPU resources which is known as '''resource contention. However, with MIG, an GPU instance is completely put aside for a specific application.''' MIG feature allows a single GPU into multiple fully isolated virtual GPU devices that are efficiently sized per-user-case, specifically smaller use-cases that only require a subset of GPU resources.
{{Status
|status=Draft
|owner=Knowledge Agent
|last_update=2026-07-15
|review=Pending
}}


MIG ensures to providing each instance's processors have separate and isolated paths through the entire memory system - the on-chip crossbar ports, L2 cache banks, memory controllers, and DRAM address busses are all assigned uniquely to an individual instanceenhanced isolation GPU resources.
{{TOC}}
[[File:Nvidia-mig-example.png|right|frameless|nvidia-mig-example]]


Benefits of MIG on MIG featured GPU are
== Overview ==
*Physical allocation of resourdces used by parallel GPU workloads - Secure multi-tenant environments with isolation and predictable QoS
*Versatile profiles with dynamic configuration - Maximized utilization by configuring for specfic workloads
*[[CUDA]] programming model unchanged


== MIG Teminology ==
NVIDIA MIG(Multi-Instance GPU)는 Ampere 아키텍처(2020)부터 도입된 기능으로, 단일 GPU를 여러 개의 완전히 격리된 가상 GPU 디바이스로 분할합니다. 각 인스턴스는 특정 애플리케이션에 할당되어 리소스 경쟁(Resource Contention)을 방지합니다.
MIG feature allows one or more GPU instances to be allocated within a GPU. so that a single GPU appear as if it were many.


=== GPU instalace(GI) ===
=== Summary ===
is a fully isolated collection of all physical GPU resources such as GPU memory, GPU SMs. it can contain one or more GPU compute instances


=== Compute instance(CI) ===
* 무엇인가? — 단일 GPU를 여러 격리된 인스턴스로 분할
is an isolated collection of GPU SMs (CUDA cores) belongs to a single GPU instance. so that it provides partial isolation within the GPU instance for compute resourdces and independent [[workload]] scheduling.
* 왜 필요한가? — 멀티 테넌트 환경에서 격리된 QoS 보장, 리소스 효율적 활용
* 언제 사용하는가? — HPC, AI/ML 멀티 테넌트, GPU 클라우드


=== MIG device ===
is made up with GPU instance and a compute instance. MIG devices are assigned GPU UUIDs and can be displayed with
$nvidia-smi -L 


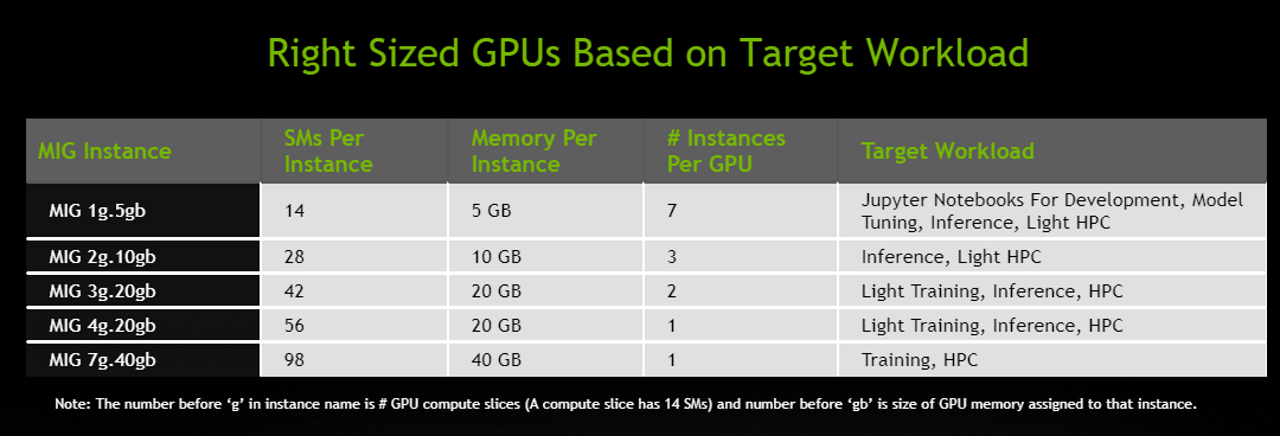
To use MIG feature effectivly, clock speed, MIG profile congifuration, and other settings should be optimized base on the expected MIG use-case. There is no 'best' or 'optimal' combination of profiles and configurations. however, [https://blogs.nvidia.com/wp-content/uploads/2020/05/MIG-table-FINAL-x1280.png this table] shows NVIDIA recommended workload types for the different MIG sizes of the A100
== Purpose ==


=== GPU Slice ===
이 문서가 존재하는 이유
is the smallest fraction of the GPU that combines a single GPU memory slice and a single GPU SM slice


=== GPU Memory Slice ===
* Goal: MIG 개념, 프로파일, 구성, 모니터링, 지원 GPU 제공
is the smallest fraction of the GPU's memory including the corresponding memory controllers and cache. generally it is roughly 1/8 of the total GPU memory resources.
* Scope: GI/CI 개념, MIG 프로파일, 활성화/비활성화, 인스턴스 생성/삭제, DCGM 모니터링
* Non-goals: CUDA 프로그래밍, MPS 통합 상세 설정은 별도 문서


=== GPU SM Slice ===
the smallest fraction of the GPU's SMs. generally it is roughly 1/7 of the total number of SMs


=== GPU Engine ===
== Key Concepts ==
what executes job on the GPU that scheduled independently and work in a GPU context. different engines are responsible for different actions such as compute engine or copy engine


== MIG Configuration (profile) ==
{| class="wikitable"
GPU persistence mode and GPU reset required to enable or disable MIG mode, this is one-time operation per GPU and persists across system reboots.
! Concept
! Description
! Related
|-
| GI (GPU Instance)
| GPU 리소스 완전 격리 집합 (SM + 메모리)
| [[MIG]]
|-
| CI (Compute Instance)
| GI 내 부분 격리된 SM 집합
| [[MIG]]
|-
| MIG Device
| GI + CI 조합 — UUID로 식별
| [[MIG]]
|-
| GPU Slice
| 최소 분할 단위 (메모리 + SM)
| [[MIG]]
|-
| MIG Profile
| 18가지 조합 — 리소스 할당 패턴
| [[MIG]]
|-
| DCGM
| DCGM 모니터링 — MIG 메트릭
| [[MIG]]
|-
| Persistence Mode
| MIG 활성화 필수 — 재부팅 시 지속
| [[MIG]]
|-
| MPS
| Multi-Process Service — MIG와 연동 가능
| [[MIG]]
|}
 
 
== Architecture ==
 
MIG는 GPU 리소스를 계층적으로 분할합니다:
 
<syntaxhighlight lang="mermaid">
graph TD
    A[NVIDIA GPU] --> B[GPU Instance 1]
    A --> C[GPU Instance 2]
    A --> D[GPU Instance N]
    B --> E[Compute Instance 1]
    B --> F[Compute Instance 2]
    C --> G[Compute Instance 3]
    E --> H[MIG Device 0:0]
    F --> I[MIG Device 0:1]
    G --> J[MIG Device 0:2]
    H --> K[CUDA Workload]
    I --> L[CUDA Workload]
    J --> M[CUDA Workload]
</syntaxhighlight>
 
 
== Workflow ==
 
{| class="wikitable"
! Stage
! Input
! Output
|-
| Enable MIG
| nvidia-smi -mig 1
| MIG Mode Enabled
|-
| Create GI/CI
| nvidia-smi -cgi 9,19,19,19
| GPU Instances Created
|-
| Use MIG
| [[docker]] --gpus device=MIG-UUID
| Isolated GPU Access
|-
| Monitor
| dcgmi dmon
| MIG Metrics
|-
| Destroy
| nvidia-smi -dgi
| Instances Removed
|}
 
 
== Detailed Explanation ==
 
=== MIG 용어 ===
 
==== GPU Instance (GI) ====
완전히 격리된 GPU 리소스 집합 (SM + 메모리). 하나 이상의 Compute Instance를 포함할 수 있습니다.
 
==== Compute Instance (CI) ====
단일 GPU Instance 내 격리된 SM 집합. 부분 격리로 컴퓨트 리소스와 독립적인 워크로드 스케줄링을 제공합니다.
 
==== MIG Device ====
GI + CI 조합. GPU UUID로 식별되며 `nvidia-smi -L`로 확인 가능합니다.


The number of slices that a GPU can be created with is not arbitrary. The [[NVIDIA driver]] APIs provide a number of “GPU Instance Profiles” and users can create GIs by specifying one of these profiles.  18 combinations possible.
==== GPU Slice ====
가장 작은 분할 단위 — 단일 GPU 메모리 슬라이스 + 단일 GPU SM 슬라이스 조합.
* GPU Memory Slice: 전체 메모리의 약 1/8
* GPU SM Slice: 전체 SM의 약 1/7
 
==== GPU Engine ====
GPU 컨텍스트에서 독립적으로 실행되는 작업 실행기. 컴퓨트 엔진, 복사 엔진 등 다양한 엔진이 있습니다.
 
=== MIG 장점 ===
 
* 물리적 리소스 할당 — 병렬 GPU 워크로드 격리
* 보안 멀티 테넌트 — 예측 가능한 QoS 보장
* 동적 구성 — 다양한 워크로드에 맞는 프로파일
* CUDA 프로그래밍 모델 변경 불필요
 
=== MIG 프로파일 ===
 
18가지 조합이 가능합니다. H100 NVL 예시:
 
{| class="wikitable"
! Profile
! Memory
! SM
! DEC
! ENC
! JPEG
! OFA
! Max Instances
|-
| MIG 1g.12gb
| 10.75 GiB
| 16
| 1
| 0
| 1
| 0
| 7
|-
| MIG 1g.12gb+me
| 10.75 GiB
| 16
| 1
| 0
| 1
| 1
| 1
|-
| MIG 1g.24gb
| 21.62 GiB
| 26
| 1
| 0
| 1
| 0
| 4
|-
| MIG 2g.24gb
| 21.62 GiB
| 32
| 2
| 0
| 2
| 0
| 3
|-
| MIG 3g.47gb
| 46.38 GiB
| 60
| 3
| 0
| 3
| 0
| 2
|-
| MIG 4g.47gb
| 46.38 GiB
| 64
| 4
| 0
| 4
| 0
| 1
|-
| MIG 7g.94gb
| 93.12 GiB
| 132
| 7
| 0
| 7
| 1
| 1
|}
 
=== MIG 활성화 ===


<syntaxhighlight lang="bash">
# H100 NVL, show available MIG profiles
# Persistence Mode 활성화 (필수)
$ nvidia-smi mig -lgip
$ sudo nvidia-smi -pm 1
+-----------------------------------------------------------------------------+
 
| GPU instance profiles:                                                      |
# MIG 활성화
| GPU  Name            ID    Instances  Memory    P2P    SM    DEC  ENC  |
$ sudo nvidia-smi -mig 1
|                              Free/Total  GiB              CE    JPEG  OFA  |
|=============================================================================|
|  0  MIG 1g.12gb      19    7/7        10.75      No    16    1    0  |
|                                                            1    1    0  |
+-----------------------------------------------------------------------------+
|  0  MIG 1g.12gb+me    20    1/1        10.75      No    16    1    0  |
|                                                            1    1    1  |
+-----------------------------------------------------------------------------+
|  0  MIG 1g.24gb      15    4/4        21.62      No    26    1    0  |
|                                                            1    1    0  |
+-----------------------------------------------------------------------------+
|  0  MIG 2g.24gb      14    3/3        21.62      No    32    2    0  |
|                                                            2    2    0  |
+-----------------------------------------------------------------------------+
|  0  MIG 3g.47gb        9    2/2        46.38      No    60    3    0  |
|                                                            3    3    0  |
+-----------------------------------------------------------------------------+
|  0  MIG 4g.47gb        5    1/1        46.38      No    64    4    0  |
|                                                            4    4    0  |
+-----------------------------------------------------------------------------+
|  0  MIG 7g.94gb        0    1/1        93.12      No    132    7    0  |
|                                                            8    7    1   |
+-----------------------------------------------------------------------------+


# MIG 상태 확인
$ nvidia-smi --query-gpu=pci.bus_id,mig.mode.current --format=csv
</syntaxhighlight>
</syntaxhighlight>
== Enable MIG Mode ==
When MIG is enabled on the GPU, depending on the GPU product, the driver will attempt to reset the GPU so that MIG mode can                          take effect.                                         <syntaxhighlight lang="bash">
$ sudo nvidia-smi -pm 1    # persistence mode is required to enable MIG
Enabled Legacy persistence mode for GPU 00000000:4F:00.0.
All done.


$ sudo nvidia-smi -mig 1   # Enable MIG
**주의:** "MIG mode is in pending enable state" 메시지가 나오면 `nvsm`과 `dcgm`을 중지 후 재시도:
Enabled MIG Mode for GPU 00000000:4F:00.0
 
All done.
<syntaxhighlight lang="bash">
$ sudo systemctl stop nvsm
$ sudo systemctl stop dcgm
$ sudo nvidia-smi -i 0 -mig 1
</syntaxhighlight>


#Verify enabled MIG mode
=== GPU Instance 프로파일 확인 ===
$ nvidia-smi --query-gpu=pci.bus_id,mig.mode.current --format=csv           
pci.bus_id, mig.mode.current
00000000:4F:00.0, Enabled
</syntaxhighlight>If encounter a message saying “Warning: MIG mode is in pending enable state for GPU XXX:XX:XX.X:In use by another client …”, when enabling MIG. you need to stop '''nvsm''' and '''dcgm''', then try again.<ref>https://docs.nvidia.com/datacenter/tesla/mig-user-guide/</ref>
$ sudo systemctl stop nvsm
$ sudo systemctl stop dcgm
$ sudo nvidia-smi -i 0 -mig 1


<nowiki>**</nowiki> Reference [https://docs.nvidia.com/datacenter/tesla/mig-user-guide/ MIG user guide] for various post processing of MIG configuration change to take effect.
<syntaxhighlight lang="bash">
# 사용 가능한 MIG 프로파일 확인
$ nvidia-smi mig -lgip


== List GPU Instance Profiles ==
# 배치 확인
List the possible placements available using the following command. it would be helpful to review [https://cloud.redhat.com/blog/using-nvidia-a100s-multi-instance-gpu-to-run-multiple-workloads-in-parallel-on-a-single-gpu performance of different MIG instance size] using [[MLPerf]] with Single Shot MultiBox Detector (SSD) training [[benchmark]]. 
The syntax of the placement is {<index>}:<GPU Slice Count> and shows the placement of the instances on the GPU  <syntaxhighlight lang="bash">
#H100 NVL, list possible placements
#The syntax of the placement output is {<index>}:<GPU Slice Count> and shows the placement of the instances on the GPU
$ nvidia-smi mig -lgipp
GPU  0 Profile ID 19 Placements: {0,1,2,3,4,5,6}:1
</syntaxhighlight>
GPU  0 Profile ID 20 Placements: {0,1,2,3,4,5,6}:1
GPU  0 Profile ID 15 Placements: {0,2,4,6}:2
GPU  0 Profile ID 14 Placements: {0,2,4}:2
GPU  0 Profile ID  9 Placements: {0,4}:4
GPU  0 Profile ID  5 Placement : {0}:4
GPU  0 Profile ID  0 Placement : {0}:8
</syntaxhighlight>
== Creating GPU Instances ==
Without creating GPU instances (including corresponding compute instances), CUDA workloads cannot be run on the GPU.


Creating GPU instances using the <samp>-cgi</samp> and create the corresponding Compute Instances (CI). By using the <samp>-C</samp> option
=== GPU Instance 생성 ===


<syntaxhighlight lang="bash">
# no GPU instances yet
# 현재 인스턴스 확인
$ nvidia-smi mig -lgi
No GPU instances found: Not Found


# Create 9,19,19,19 partitions
# GPU Instance 생성 (프로파일 ID: 9, 19, 19, 19)
# -cgi : this flag specifies the MIG partition configuration. The numbers following the flag represent the MIG partitions for each of the four MIG device slices. In this case, there are four slices with configurations 9, 19, 19, and 19 compute instances each. These numbers correspond to the profile IDs retrieved previously
# creates the corresponding compute instances for the MIG partitions automatically
$ sudo nvidia-smi mig -cgi 9,19,19,19 -C
Successfully created GPU instance ID  2 on GPU  0 using profile MIG 3g.47gb (ID  9)
Successfully created compute instance ID  0 on GPU  0 GPU instance ID  2 using profile MIG 3g.47gb (ID  2)
Successfully created GPU instance ID  7 on GPU  0 using profile MIG 1g.12gb (ID 19)
Successfully created compute instance ID  0 on GPU  0 GPU instance ID  7 using profile MIG 1g.12gb (ID  0)
Successfully created GPU instance ID  8 on GPU  0 using profile MIG 1g.12gb (ID 19)
Successfully created compute instance ID  0 on GPU  0 GPU instance ID  8 using profile MIG 1g.12gb (ID  0)
Successfully created GPU instance ID  9 on GPU  0 using profile MIG 1g.12gb (ID 19)
Successfully created compute instance ID  0 on GPU  0 GPU instance ID  9 using profile MIG 1g.12gb (ID  0)


# List current MIG GPU instances
# 생성된 인스턴스 확인
$ sudo nvidia-smi mig -lgi
+-------------------------------------------------------+
</syntaxhighlight>
| GPU instances:                                        |
| GPU  Name            Profile  Instance  Placement  |
|                          ID      ID      Start:Size |
|=======================================================|
|  0  MIG 1g.12gb        19        7          0:1    |
+-------------------------------------------------------+
|  0  MIG 1g.12gb        19        8          1:1    |
+-------------------------------------------------------+
|  0  MIG 1g.12gb        19        9          2:1    |
+-------------------------------------------------------+
|  0  MIG 3g.47gb          9        2          4:4    |
+-------------------------------------------------------+
</syntaxhighlight>List up MIG devices<syntaxhighlight lang="bash">
# Show GPU UUID, docker container can use the UUID
$ nvidia-smi -L
GPU 0: NVIDIA H100 NVL (UUID: GPU-d2481ba7-bc0a-5ff0-0d5b-b4ba1d4d56c5)
  MIG 3g.47gb    Device  0: (UUID: MIG-45174f60-85a9-51f4-bc61-f6dc57dc60e1)
  MIG 1g.12gb    Device  1: (UUID: MIG-b6bbb81c-71b7-54a2-a621-9b2a12215cab)
  MIG 1g.12gb    Device  2: (UUID: MIG-ea284e9f-1cfb-5980-8948-bc86b7c1ae71)
  MIG 1g.12gb    Device  3: (UUID: MIG-2bbae2fb-2ef8-5917-badf-b0571b1381cf)
 
# Show physical GPU and MIG devices
$ nvidia-smi
Sun May 25 22:19:13 2025     
+-----------------------------------------------------------------------------------------+
| NVIDIA-SMI 570.124.04            Driver Version: 570.124.04    CUDA Version: 12.8    |
|-----------------------------------------+------------------------+----------------------+
| GPU  Name                Persistence-M | Bus-Id          Disp.A | Volatile Uncorr. ECC |
| Fan  Temp  Perf          Pwr:Usage/Cap |          Memory-Usage | GPU-Util  Compute M. |
|                                        |                        |              MIG M. |
|=========================================+========================+======================|
|  0  NVIDIA H100 NVL                On  |  00000000:4F:00.0 Off |                  On |
| N/A  38C    P0            58W /  400W |      87MiB /  95830MiB |    N/A      Default |
|                                        |                        |              Enabled |
+-----------------------------------------+------------------------+----------------------+


+-----------------------------------------------------------------------------------------+
=== MIG 디바이스 확인 ===
| MIG devices:                                                                            |
+------------------+----------------------------------+-----------+-----------------------+
| GPU  GI  CI  MIG |                    Memory-Usage |        Vol|        Shared        |
|      ID  ID  Dev |                      BAR1-Usage | SM    Unc| CE ENC  DEC  OFA  JPG |
|                  |                                  |        ECC|                      |
|==================+==================================+===========+=======================|
|  0    2  0  0  |              44MiB / 47488MiB    | 60      0 |  3  0    3    0    3 |
|                  |                0MiB / 65535MiB  |          |                      |
+------------------+----------------------------------+-----------+-----------------------+
|  0    7  0  1  |              15MiB / 11008MiB    | 16      0 |  1  0    1    0    1 |
|                  |                0MiB / 16383MiB  |          |                      |
+------------------+----------------------------------+-----------+-----------------------+
|  0    8  0  2  |              15MiB / 11008MiB    | 16      0 |  1  0    1    0    1 |
|                  |                0MiB / 16383MiB  |          |                      |
+------------------+----------------------------------+-----------+-----------------------+
|  0    9  0  3  |              15MiB / 11008MiB    | 16      0 |  1  0    1    0    1 |
|                  |                0MiB / 16383MiB  |          |                      |
+------------------+----------------------------------+-----------+-----------------------+
| Processes:                                                                              |
|  GPU  GI  CI              PID  Type  Process name                        GPU Memory |
|        ID  ID                                                              Usage      |
|=========================================================================================|
|  No running processes found                                                            |
+-----------------------------------------------------------------------------------------+
</syntaxhighlight>


== Use MIG device ==
<syntaxhighlight lang="bash">
# To use specific GPU instance, need to check device ID or MIG UUID
# MIG UUID 확인 (Docker에서 사용)
$ nvidia-smi -L
$ nvidia-smi -L
GPU 0: NVIDIA H100 NVL (UUID: GPU-d2481ba7-bc0a-5ff0-0d5b-b4ba1d4d56c5)
  MIG 3g.47gb    Device  0: (UUID: MIG-45174f60-85a9-51f4-bc61-f6dc57dc60e1)
  MIG 1g.12gb    Device  1: (UUID: MIG-b6bbb81c-71b7-54a2-a621-9b2a12215cab)
  MIG 1g.12gb    Device  2: (UUID: MIG-ea284e9f-1cfb-5980-8948-bc86b7c1ae71)
  MIG 1g.12gb    Device  3: (UUID: MIG-2bbae2fb-2ef8-5917-badf-b0571b1381cf)


# Above list shows, GPU ID0 has MIG device ID 0 ~ 3, in short we can access MIG GI as
# 전체 GPU + MIG 상태
# GPUID:MIG DeviceID, for example, 0:0, 0:1, 0:2 and 0:3 respectively
$ nvidia-smi
</syntaxhighlight>


# Use MIG device 0:2 using UUID in docker container
=== MIG 디바이스 사용 ===
$ docker run --gpus '"device=MIG-ea284e9f-1cfb-5980-8948-bc86b7c1ae71"' --rm nvidia/cuda:11.8.0-base-ubuntu20.04 nvidia-smi 
Sun May 25 22:56:04 2025     
+-----------------------------------------------------------------------------------------+
| NVIDIA-SMI 570.124.04            Driver Version: 570.124.04    CUDA Version: 12.8    |
|-----------------------------------------+------------------------+----------------------+
| GPU  Name                Persistence-M | Bus-Id          Disp.A | Volatile Uncorr. ECC |
| Fan  Temp  Perf          Pwr:Usage/Cap |          Memory-Usage | GPU-Util  Compute M. |
|                                        |                        |              MIG M. |
|=========================================+========================+======================|
|  0  NVIDIA H100 NVL                On  |  00000000:4F:00.0 Off |                  On |
| N/A  39C    P0            59W /  400W |                  N/A  |    N/A      Default |
|                                        |                        |              Enabled |
+-----------------------------------------+------------------------+----------------------+
+-----------------------------------------------------------------------------------------+
| MIG devices:                                                                            |
+------------------+----------------------------------+-----------+-----------------------+
| GPU  GI  CI  MIG |                    Memory-Usage |        Vol|        Shared        |
|      ID  ID  Dev |                      BAR1-Usage | SM    Unc| CE ENC  DEC  OFA  JPG |
|                  |                                  |        ECC|                      |
|==================+==================================+===========+=======================|
|  0    8  0  0  |              15MiB / 11008MiB    | 16      0 |  1  0    1    0    1 |
|                  |                0MiB / 16383MiB  |          |                      |
+------------------+----------------------------------+-----------+-----------------------+
| Processes:                                                                              |
|  GPU  GI  CI              PID  Type  Process name                        GPU Memory |
|        ID  ID                                                              Usage      |
|=========================================================================================|
|  No running processes found                                                            |
+-----------------------------------------------------------------------------------------+


# In short, we can also use GPUID:MIG DeviceID instead of UUID
<syntaxhighlight lang="bash">
$ docker run --gpus '"device=0:1"' --rm nvidia/cuda:11.8.0-base-ubuntu20.04 nvidia-smi  
# UUID로 접근
Sun May 25 22:56:47 2025     
$ docker run --gpus '"device=MIG-ea284e9f-1cfb-5980-8948-bc86b7c1ae71"' --rm nvidia/cuda:11.8.0-base-ubuntu20.04 nvidia-smi
+-----------------------------------------------------------------------------------------+
 
| NVIDIA-SMI 570.124.04            Driver Version: 570.124.04    CUDA Version: 12.8    |
# GPUID:MIG DeviceID로 접근
|-----------------------------------------+------------------------+----------------------+
$ docker run --gpus '"device=0:1"' --rm nvidia/cuda:11.8.0-base-ubuntu20.04 nvidia-smi
| GPU  Name                Persistence-M | Bus-Id          Disp.A | Volatile Uncorr. ECC |
| Fan  Temp  Perf          Pwr:Usage/Cap |          Memory-Usage | GPU-Util  Compute M. |
|                                        |                        |              MIG M. |
|=========================================+========================+======================|
|  0  NVIDIA H100 NVL                On  |  00000000:4F:00.0 Off |                  On |
| N/A  39C    P0            59W /  400W |                  N/A  |    N/A      Default |
|                                        |                        |              Enabled |
+-----------------------------------------+------------------------+----------------------+
| MIG devices:                                                                           |
+------------------+----------------------------------+-----------+-----------------------+
| GPU  GI  CI  MIG |                    Memory-Usage |        Vol|        Shared        |
|      ID  ID  Dev |                      BAR1-Usage | SM    Unc| CE ENC  DEC  OFA  JPG |
|                  |                                  |        ECC|                      |
|==================+==================================+===========+=======================|
|  0    7  0  0  |              15MiB / 11008MiB    | 16      0 |  1  0   1    0    1 |
|                  |                0MiB / 16383MiB  |          |                      |
+------------------+----------------------------------+-----------+-----------------------+
| Processes:                                                                              |
|  GPU  GI  CI              PID  Type  Process name                        GPU Memory |
|        ID  ID                                                              Usage      |
|=========================================================================================|
|  No running processes found                                                            |
+-----------------------------------------------------------------------------------------+
</syntaxhighlight>
</syntaxhighlight>


== Destroying GPU Instances ==
=== GPU Instance 삭제 ===


=== <kbd>Destroy all the CIs and GIs</kbd> ===
<syntaxhighlight lang="bash">
# 모든 CI 및 GI 삭제
$ sudo nvidia-smi mig -dci && sudo nvidia-smi mig -dgi
Successfully destroyed compute instance ID  0 from GPU  0 GPU instance ID  7
 
Successfully destroyed compute instance ID  0 from GPU  0 GPU instance ID  8
# 특정 GI의 CI만 삭제
Successfully destroyed compute instance ID  0 from GPU  0 GPU instance ID  9
$ sudo nvidia-smi mig -dci -ci 0,1,2 -gi 1
Successfully destroyed compute instance ID  0 from GPU  0 GPU instance ID  2
Successfully destroyed GPU instance ID  7 from GPU  0
Successfully destroyed GPU instance ID  8 from GPU  0
Successfully destroyed GPU instance ID  9 from GPU  0
Successfully destroyed GPU instance ID  2 from GPU  0
</syntaxhighlight>
</syntaxhighlight>


=== Delete the specific CIs created under GI 1 ===
=== MIG 모니터링 ===
<kbd>$ sudo nvidia-smi mig -dci -ci 0,1,2 -gi 1</kbd>
Successfully destroyed compute instance ID  0 from GPU  0 GPU instance ID  1
Successfully destroyed compute instance ID  1 from GPU  0 GPU instance ID  1
Successfully destroyed compute instance ID  2 from GPU  0 GPU instance ID  1
 
== <kbd>Monitoring MIG Devices</kbd> ==
Nvidia-smi does not [[support]] utilization metrics to MIG devices. The utilization is displayed as N/A when running CUDA programs.
 
For monitoring MIG devices, Nvidia recommendes to use NVIDIA DCGM v2.0.13 or later.


For more information
nvidia-smi는 MIG 디바이스 사용률 메트릭을 지원하지 않습니다 (N/A 표시). NVIDIA는 DCGM v2.0.13 이상을 권장합니다.


* [https://servicedesk.surf.nl/wiki/spaces/WIKI/pages/92668151/dcgmi+dmon How to use DCGM]
* [https://docs.nvidia.com/datacenter/dcgm/latest/user-guide/feature-overview.html#profiling-metrics DCGM document]
<syntaxhighlight lang="bash">
$dcgmi dmon -e 203,204,1001,1002,1003,1004,1005,1009,1010,1011,1012,155 -i <GPU IDs>
# DCGM으로 MIG 모니터링
* -e indicate the metrics we want to query. (GPU Activity (1001), Tensor Core Utilization (1004), etc)
$ dcgmi dmon -e 203,204,1001,1002,1003,1004,1005,1009,1010,1011,1012,155 -i <GPU IDs>
</syntaxhighlight>


query metrics is defined in https://github.com/NVIDIA/DCGM/blob/master/dcgmlib/dcgm_fields.h
=== MIG 제한사항 ===
</syntaxhighlight>
[[File:Dcgmi-gpu-utilization.png|center|frameless|923x923px|dcgmi-gpu-utilization]]


== MIG and Multi-Process Service<ref>https://docs.nvidia.com/deploy/mps/index.html</ref> ==
* 그래픽 컨텍스트 미지원
MPS ([https://docs.nvidia.com/deploy/mps/index.html Multi-Process Service]) and MIG can work together, potentially achieving even higher levels of utilization for certain workloads.
* P2P 미지원 (NVLink 없음)


=== MIG and MPS Workflow ===
=== MIG 지원 GPU ===


* Configure the desired MIG geometry on the GPU.
{| class="wikitable"
* Setup the CUDA_MPS_PIPE_DIRECTORY variable to point to unique directories so that the multiple MPS servers and clients can communicate with each other using named pipes and Unix domain sockets.
! GPU
* Launch the application by specifying the MIG device using CUDA_VISIBLE_DEVICES
! CUDA Version
! NVIDIA Driver Version
|-
| A100 / A30
| CUDA 11
| R525 (>= 525.53)
|-
| H100 / H200
| CUDA 12
| R450 (>= 450.80.02)
|-
| B200
| CUDA 12
| R570 (>= 570.133.20)
|-
| RTX PRO 6000 Blackwell (전 버전)
| CUDA 12
| R575 (>= 575.51.03)
|-
| RTX PRO 5000 Blackwell
| CUDA 12
| R575 (>= 575.51.03)
|}


== MIG limitation ==
=== NVIDIA Display Mode (Workstation GPU) ===


* Graphics contexts not supported
RTX PRO Blackwell 시리즈는 MIG 활성화 전 Display Mode를 Compute로 설정해야 합니다.
* P2P not available (no NVLink)


== NVIDIA Display Mode <ref>https://developer.nvidia.com/displaymodeselector</ref> ==
<syntaxhighlight lang="bash">
The NVIDIA Display Mode Selector Tool is a utility designed to configure the ideal display mode for various specialized applications, such as CAVES, Virtual Production, Location-based Entertainment, and Universal Multi-instance GPU (MIG). It is compatible with the following GPUs:     
# vBIOS 버전 확인
$ nvidia-smi --query-gpu=vbios_version --format=csv


* NVIDIA RTX PRO 6000 Blackwell Server Edition,
# Display Mode를 Compute로 설정
* NVIDIA RTX PRO 6000 Blackwell Workstation Edition,
$ sudo ./DisplayModeSelector --gpumode=compute --gpu=<GPU_ID>
* NVIDIA RTX PRO 6000 Blackwell Max-Q Workstation Edition,
* NVIDIA RTX PRO 5000 Blackwell,
* NVIDIA L40S,
* NVIDIA L40,
* NVIDIA RTX 6000 Ada,
* NVIDIA RTX 5000 Ada,
* NVIDIA A40,
* NVIDIA RTX A5000,
* NVIDIA RTX A5500
* NVIDIA RTX A6000 GPUs.


=== Additional Prerequisites for RTX PRO Blackwell GPUs ===
# Graphics 모드로 복귀
Display mode by default will be set to graphics, this must be set to compute  using DisplayModeSelector (>=1.72.0) before MIG can be enabled for Workstation Edition and Max-Q Workstation Edition GPUs.<ref>https://docs.nvidia.com/datacenter/tesla/pdf/MIG_User_Guide.pdf</ref>
$ sudo ./DisplayModeSelector --gpumode=graphics --gpu=<GPU_ID>
</syntaxhighlight>


**RTX PRO Blackwell 최소 vBIOS 버전:**


Verify the GPU vBIOS version meets minimum versions listed in the following table.
{| class="wikitable"
|+
! GPU
!GPU
! Minimum vBIOS
!Minimum vBIOS version
|-
|-
|RTX PRO 5000 Blackwell
| RTX PRO 5000 Blackwell
|98.02.73.00.00
| 98.02.73.00.00
|-
|-
|RTX PRO 6000 Blackwell Workstation Edition
| RTX PRO 6000 Blackwell Workstation
|98.02.55.00.00
| 98.02.55.00.00
|-
|-
|RTX PRO 6000 Blackwell Max-Q
| RTX PRO 6000 Blackwell Max-Q
|98.02.6A.00.00
| 98.02.6A.00.00
|}
|}
**주의:** 단일 카드 워크스테이션에서 primary display로 사용하는 GPU를 Compute 모드로 설정하면 물리적 디스플레이 출력이 비활성화됩니다. SSH 접근 가능 확인 후 진행.
=== MIG와 MPS 연동 ===
MPS(Multi-Process Service)와 MIG는 함께 작동하여 더 높은 활용률 달성 가능:
1. 원하는 MIG 기하학 구성
2. `CUDA_MPS_PIPE_DIRECTORY` 설정
3. `CUDA_VISIBLE_DEVICES`로 MIG 디바이스 지정하여 애플리케이션 실행
== Configuration ==
<syntaxhighlight lang="bash">
To check the current vBIOS version:
# MIG 활성화
$ sudo nvidia-smi -pm 1
$ sudo nvidia-smi -mig 1
 
# 프로파일 확인
$ nvidia-smi mig -lgip
 
# 인스턴스 생성
$ sudo nvidia-smi mig -cgi 9,19,19,19 -C
 
# 인스턴스 확인
$ nvidia-smi mig -lgi
 
# MIG 디바이스 사용 (Docker)
$ docker run --gpus '"device=MIG-UUID"' --rm nvidia/cuda:11.8.0-base nvidia-smi
 
# 모니터링
$ dcgmi dmon -e 1001,1004 -i 0


$ nvidia-smi --query-gpu=vbios_version --format=csv
# 인스턴스 삭제
$ sudo nvidia-smi mig -dci && sudo nvidia-smi mig -dgi
</syntaxhighlight>
</syntaxhighlight>


Set GPU mode example, <syntaxhighlight lang="bash">
== Examples ==
To set display mode to compute:
sudo .∕DisplayModeSelector --gpumode=compute --gpu=<GPU_ID>


To switch back to graphics mode:
=== Example 1: H100 NVL에서 MIG 구성 ===
sudo .∕DisplayModeSelector --gpumode=graphics --gpu=<GPU_ID


<syntaxhighlight lang="bash">
# MIG 활성화
$ sudo nvidia-smi -pm 1
$ sudo nvidia-smi -mig 1


# 프로파일 확인
$ nvidia-smi mig -lgip
# 인스턴스 생성 (3g.47gb + 3x 1g.12gb)
$ sudo nvidia-smi mig -cgi 9,19,19,19 -C
# 확인
$ nvidia-smi mig -lgi
$ nvidia-smi -L
</syntaxhighlight>
=== Example 2: Docker에서 MIG 디바이스 사용 ===
<syntaxhighlight lang="bash">
# UUID로 접근
$ docker run --gpus '"device=MIG-45174f60-85a9-51f4-bc61-f6dc57dc60e1"' --rm nvidia/cuda:12.0 nvidia-smi
# GPUID:MIG DeviceID로 접근
$ docker run --gpus '"device=0:0"' --rm nvidia/cuda:12.0 nvidia-smi
</syntaxhighlight>
</syntaxhighlight>


== MIG supported GPUs<ref>https://docs.nvidia.com/datacenter/tesla/mig-user-guide/</ref> ==
{| class="wikitable"
!GPU<ref>https://docs.nvidia.com/datacenter/tesla/mig-user-guide/getting-started-with-mig.html</ref>
!CUDA Version
!NVIDIA Driver Version
|-
|A100 / A30
|CUDA 11
|R525 (>= 525.53) or later
|-
|H100 / H200
|CUDA 12
|R450 (>= 450.80.02) or later
|-
|B200
|CUDA 12
|R570 (>= 570.133.20) or later
|-
|RTX PRO 6000 Blackwell (All editions)


RTX PRO 5000 Blackwell
== Best Practices ==
|CUDA 12
 
|R575 (>= 575.51.03) or later
* Persistence Mode 필수 활성화 (재부팅 시 지속)
|}
* 워크로드에 맞는 MIG 프로파일 선택
* DCGM v2.0.13+ 사용 (MIG 모니터링)
* 정기적인 인스턴스 정리 (미사용 인스턴스 삭제)
* RTX PRO Blackwell은 Display Mode 먼저 Compute로 설정
* SSH 접근 확인 후 Display Mode 변경 (primary display GPU)
* MPS 연동으로 더 높은 활용률 달성
 
 
== Limitations ==
 
* 그래픽 컨텍스트 미지원
* P2P/NVLink 미지원
* MIG 활성화/비활성화는 GPU 리셋 필요 (일회성 작업)
* 인스턴스 생성/삭제는 재부팅 시 초기화
* nvidia-smi만으로는 MIG 메트릭 확인 불가 (DCGM 필요)
 
 
== References ==
 
* https://docs.nvidia.com/datacenter/tesla/mig-user-guide/
* https://blogs.nvidia.com/wp-content/uploads/2020/05/MIG-table-FINAL-x1280.png
* https://docs.nvidia.com/deploy/mps/index.html
 
 
== Related Pages ==
 
* [[NVIDIA GPU]]
* [[CUDA]]
* [[NVIDIA driver]]
* [[DCGM]]
* [[MPS]]
 
 
[[Category:Linux]]
== Knowledge Graph ==
 
Related
 
→ [[Linux]]
→ [[Server]]
→ [[Hardware]]
→ [[Network]]


== References==
[[Category:Reference]]
<references />

Latest revision as of 11:29, 17 July 2026

NVIDIA MIG (Multi-Instance GPU)

Template:Status

Template:TOC

Overview

NVIDIA MIG(Multi-Instance GPU)는 Ampere 아키텍처(2020)부터 도입된 기능으로, 단일 GPU를 여러 개의 완전히 격리된 가상 GPU 디바이스로 분할합니다. 각 인스턴스는 특정 애플리케이션에 할당되어 리소스 경쟁(Resource Contention)을 방지합니다.

Summary

  • 무엇인가? — 단일 GPU를 여러 격리된 인스턴스로 분할
  • 왜 필요한가? — 멀티 테넌트 환경에서 격리된 QoS 보장, 리소스 효율적 활용
  • 언제 사용하는가? — HPC, AI/ML 멀티 테넌트, GPU 클라우드


Purpose

이 문서가 존재하는 이유

  • Goal: MIG 개념, 프로파일, 구성, 모니터링, 지원 GPU 제공
  • Scope: GI/CI 개념, MIG 프로파일, 활성화/비활성화, 인스턴스 생성/삭제, DCGM 모니터링
  • Non-goals: CUDA 프로그래밍, MPS 통합 상세 설정은 별도 문서


Key Concepts

Concept Description Related
GI (GPU Instance) GPU 리소스 완전 격리 집합 (SM + 메모리) MIG
CI (Compute Instance) GI 내 부분 격리된 SM 집합 MIG
MIG Device GI + CI 조합 — UUID로 식별 MIG
GPU Slice 최소 분할 단위 (메모리 + SM) MIG
MIG Profile 18가지 조합 — 리소스 할당 패턴 MIG
DCGM DCGM 모니터링 — MIG 메트릭 MIG
Persistence Mode MIG 활성화 필수 — 재부팅 시 지속 MIG
MPS Multi-Process Service — MIG와 연동 가능 MIG


Architecture

MIG는 GPU 리소스를 계층적으로 분할합니다:

graph TD
    A[NVIDIA GPU] --> B[GPU Instance 1]
    A --> C[GPU Instance 2]
    A --> D[GPU Instance N]
    B --> E[Compute Instance 1]
    B --> F[Compute Instance 2]
    C --> G[Compute Instance 3]
    E --> H[MIG Device 0:0]
    F --> I[MIG Device 0:1]
    G --> J[MIG Device 0:2]
    H --> K[CUDA Workload]
    I --> L[CUDA Workload]
    J --> M[CUDA Workload]


Workflow

Stage Input Output
Enable MIG nvidia-smi -mig 1 MIG Mode Enabled
Create GI/CI nvidia-smi -cgi 9,19,19,19 GPU Instances Created
Use MIG docker --gpus device=MIG-UUID Isolated GPU Access
Monitor dcgmi dmon MIG Metrics
Destroy nvidia-smi -dgi Instances Removed


Detailed Explanation

MIG 용어

GPU Instance (GI)

완전히 격리된 GPU 리소스 집합 (SM + 메모리). 하나 이상의 Compute Instance를 포함할 수 있습니다.

Compute Instance (CI)

단일 GPU Instance 내 격리된 SM 집합. 부분 격리로 컴퓨트 리소스와 독립적인 워크로드 스케줄링을 제공합니다.

MIG Device

GI + CI 조합. GPU UUID로 식별되며 `nvidia-smi -L`로 확인 가능합니다.

GPU Slice

가장 작은 분할 단위 — 단일 GPU 메모리 슬라이스 + 단일 GPU SM 슬라이스 조합.

  • GPU Memory Slice: 전체 메모리의 약 1/8
  • GPU SM Slice: 전체 SM의 약 1/7

GPU Engine

GPU 컨텍스트에서 독립적으로 실행되는 작업 실행기. 컴퓨트 엔진, 복사 엔진 등 다양한 엔진이 있습니다.

MIG 장점

  • 물리적 리소스 할당 — 병렬 GPU 워크로드 격리
  • 보안 멀티 테넌트 — 예측 가능한 QoS 보장
  • 동적 구성 — 다양한 워크로드에 맞는 프로파일
  • CUDA 프로그래밍 모델 변경 불필요

MIG 프로파일

18가지 조합이 가능합니다. H100 NVL 예시:

Profile Memory SM DEC ENC JPEG OFA Max Instances
MIG 1g.12gb 10.75 GiB 16 1 0 1 0 7
MIG 1g.12gb+me 10.75 GiB 16 1 0 1 1 1
MIG 1g.24gb 21.62 GiB 26 1 0 1 0 4
MIG 2g.24gb 21.62 GiB 32 2 0 2 0 3
MIG 3g.47gb 46.38 GiB 60 3 0 3 0 2
MIG 4g.47gb 46.38 GiB 64 4 0 4 0 1
MIG 7g.94gb 93.12 GiB 132 7 0 7 1 1

MIG 활성화

# Persistence Mode 활성화 (필수)
$ sudo nvidia-smi -pm 1

# MIG 활성화
$ sudo nvidia-smi -mig 1

# MIG 상태 확인
$ nvidia-smi --query-gpu=pci.bus_id,mig.mode.current --format=csv
    • 주의:** "MIG mode is in pending enable state" 메시지가 나오면 `nvsm`과 `dcgm`을 중지 후 재시도:
$ sudo systemctl stop nvsm
$ sudo systemctl stop dcgm
$ sudo nvidia-smi -i 0 -mig 1

GPU Instance 프로파일 확인

# 사용 가능한 MIG 프로파일 확인
$ nvidia-smi mig -lgip

# 배치 확인
$ nvidia-smi mig -lgipp

GPU Instance 생성

# 현재 인스턴스 확인
$ nvidia-smi mig -lgi

# GPU Instance 생성 (프로파일 ID: 9, 19, 19, 19)
$ sudo nvidia-smi mig -cgi 9,19,19,19 -C

# 생성된 인스턴스 확인
$ sudo nvidia-smi mig -lgi

MIG 디바이스 확인

# MIG UUID 확인 (Docker에서 사용)
$ nvidia-smi -L

# 전체 GPU + MIG 상태
$ nvidia-smi

MIG 디바이스 사용

# UUID로 접근
$ docker run --gpus '"device=MIG-ea284e9f-1cfb-5980-8948-bc86b7c1ae71"' --rm nvidia/cuda:11.8.0-base-ubuntu20.04 nvidia-smi

# GPUID:MIG DeviceID로 접근
$ docker run --gpus '"device=0:1"' --rm nvidia/cuda:11.8.0-base-ubuntu20.04 nvidia-smi

GPU Instance 삭제

# 모든 CI 및 GI 삭제
$ sudo nvidia-smi mig -dci && sudo nvidia-smi mig -dgi

# 특정 GI의 CI만 삭제
$ sudo nvidia-smi mig -dci -ci 0,1,2 -gi 1

MIG 모니터링

nvidia-smi는 MIG 디바이스 사용률 메트릭을 지원하지 않습니다 (N/A 표시). NVIDIA는 DCGM v2.0.13 이상을 권장합니다.

# DCGM으로 MIG 모니터링
$ dcgmi dmon -e 203,204,1001,1002,1003,1004,1005,1009,1010,1011,1012,155 -i <GPU IDs>

MIG 제한사항

  • 그래픽 컨텍스트 미지원
  • P2P 미지원 (NVLink 없음)

MIG 지원 GPU

GPU CUDA Version NVIDIA Driver Version
A100 / A30 CUDA 11 R525 (>= 525.53)
H100 / H200 CUDA 12 R450 (>= 450.80.02)
B200 CUDA 12 R570 (>= 570.133.20)
RTX PRO 6000 Blackwell (전 버전) CUDA 12 R575 (>= 575.51.03)
RTX PRO 5000 Blackwell CUDA 12 R575 (>= 575.51.03)

NVIDIA Display Mode (Workstation GPU)

RTX PRO Blackwell 시리즈는 MIG 활성화 전 Display Mode를 Compute로 설정해야 합니다.

# vBIOS 버전 확인
$ nvidia-smi --query-gpu=vbios_version --format=csv

# Display Mode를 Compute로 설정
$ sudo ./DisplayModeSelector --gpumode=compute --gpu=<GPU_ID>

# Graphics 모드로 복귀
$ sudo ./DisplayModeSelector --gpumode=graphics --gpu=<GPU_ID>
    • RTX PRO Blackwell 최소 vBIOS 버전:**
GPU Minimum vBIOS
RTX PRO 5000 Blackwell 98.02.73.00.00
RTX PRO 6000 Blackwell Workstation 98.02.55.00.00
RTX PRO 6000 Blackwell Max-Q 98.02.6A.00.00
    • 주의:** 단일 카드 워크스테이션에서 primary display로 사용하는 GPU를 Compute 모드로 설정하면 물리적 디스플레이 출력이 비활성화됩니다. SSH 접근 가능 확인 후 진행.

MIG와 MPS 연동

MPS(Multi-Process Service)와 MIG는 함께 작동하여 더 높은 활용률 달성 가능:

1. 원하는 MIG 기하학 구성 2. `CUDA_MPS_PIPE_DIRECTORY` 설정 3. `CUDA_VISIBLE_DEVICES`로 MIG 디바이스 지정하여 애플리케이션 실행


Configuration

# MIG 활성화
$ sudo nvidia-smi -pm 1
$ sudo nvidia-smi -mig 1

# 프로파일 확인
$ nvidia-smi mig -lgip

# 인스턴스 생성
$ sudo nvidia-smi mig -cgi 9,19,19,19 -C

# 인스턴스 확인
$ nvidia-smi mig -lgi

# MIG 디바이스 사용 (Docker)
$ docker run --gpus '"device=MIG-UUID"' --rm nvidia/cuda:11.8.0-base nvidia-smi

# 모니터링
$ dcgmi dmon -e 1001,1004 -i 0

# 인스턴스 삭제
$ sudo nvidia-smi mig -dci && sudo nvidia-smi mig -dgi


Examples

Example 1: H100 NVL에서 MIG 구성

# MIG 활성화
$ sudo nvidia-smi -pm 1
$ sudo nvidia-smi -mig 1

# 프로파일 확인
$ nvidia-smi mig -lgip

# 인스턴스 생성 (3g.47gb + 3x 1g.12gb)
$ sudo nvidia-smi mig -cgi 9,19,19,19 -C

# 확인
$ nvidia-smi mig -lgi
$ nvidia-smi -L

Example 2: Docker에서 MIG 디바이스 사용

# UUID로 접근
$ docker run --gpus '"device=MIG-45174f60-85a9-51f4-bc61-f6dc57dc60e1"' --rm nvidia/cuda:12.0 nvidia-smi

# GPUID:MIG DeviceID로 접근
$ docker run --gpus '"device=0:0"' --rm nvidia/cuda:12.0 nvidia-smi


Best Practices

  • Persistence Mode 필수 활성화 (재부팅 시 지속)
  • 워크로드에 맞는 MIG 프로파일 선택
  • DCGM v2.0.13+ 사용 (MIG 모니터링)
  • 정기적인 인스턴스 정리 (미사용 인스턴스 삭제)
  • RTX PRO Blackwell은 Display Mode 먼저 Compute로 설정
  • SSH 접근 확인 후 Display Mode 변경 (primary display GPU)
  • MPS 연동으로 더 높은 활용률 달성


Limitations

  • 그래픽 컨텍스트 미지원
  • P2P/NVLink 미지원
  • MIG 활성화/비활성화는 GPU 리셋 필요 (일회성 작업)
  • 인스턴스 생성/삭제는 재부팅 시 초기화
  • nvidia-smi만으로는 MIG 메트릭 확인 불가 (DCGM 필요)


References


Related Pages

Knowledge Graph

Related

LinuxServerHardwareNetwork