MIG: Difference between revisions
(리터럴 ** 볼드 마커 제거 (MediaWiki는 ''' 볼드, **는 리터럴)) |
|||
| (13 intermediate revisions by 2 users not shown) | |||
| Line 1: | Line 1: | ||
= NVIDIA MIG (Multi-Instance GPU) = | |||
== Overview == | |||
NVIDIA MIG(Multi-Instance GPU)는 Ampere 아키텍처(2020)부터 도입된 기능으로, 단일 GPU를 여러 개의 완전히 격리된 가상 GPU 디바이스로 분할합니다. 각 인스턴스는 특정 애플리케이션에 할당되어 리소스 경쟁(Resource Contention)을 방지합니다. | |||
=== Summary === | |||
* 무엇인가? — 단일 GPU를 여러 격리된 인스턴스로 분할 | |||
* 왜 필요한가? — 멀티 테넌트 환경에서 격리된 QoS 보장, 리소스 효율적 활용 | |||
* 언제 사용하는가? — HPC, AI/ML 멀티 테넌트, GPU 클라우드 | |||
== Purpose == | |||
이 문서가 존재하는 이유 | |||
* Goal: MIG 개념, 프로파일, 구성, 모니터링, 지원 GPU 제공 | |||
* Scope: GI/CI 개념, MIG 프로파일, 활성화/비활성화, 인스턴스 생성/삭제, DCGM 모니터링 | |||
* Non-goals: CUDA 프로그래밍, MPS 통합 상세 설정은 별도 문서 | |||
=== | == Key Concepts == | ||
= | {| class="wikitable" | ||
! Concept | |||
! Description | |||
! Related | |||
|- | |||
| GI (GPU Instance) | |||
| GPU 리소스 완전 격리 집합 (SM + 메모리) | |||
| [[MIG]] | |||
|- | |||
| CI (Compute Instance) | |||
| GI 내 부분 격리된 SM 집합 | |||
| [[MIG]] | |||
|- | |||
| MIG Device | |||
| GI + CI 조합 — UUID로 식별 | |||
| [[MIG]] | |||
|- | |||
| GPU Slice | |||
| 최소 분할 단위 (메모리 + SM) | |||
| [[MIG]] | |||
|- | |||
| MIG Profile | |||
| 18가지 조합 — 리소스 할당 패턴 | |||
| [[MIG]] | |||
|- | |||
| DCGM | |||
| DCGM 모니터링 — MIG 메트릭 | |||
| [[MIG]] | |||
|- | |||
| Persistence Mode | |||
| MIG 활성화 필수 — 재부팅 시 지속 | |||
| [[MIG]] | |||
|- | |||
| MPS | |||
| Multi-Process Service — MIG와 연동 가능 | |||
| [[MIG]] | |||
|} | |||
== Architecture == | |||
MIG는 GPU 리소스를 계층적으로 분할합니다: | |||
= | <syntaxhighlight lang="mermaid"> | ||
graph TD | |||
A[NVIDIA GPU] --> B[GPU Instance 1] | |||
A --> C[GPU Instance 2] | |||
A --> D[GPU Instance N] | |||
B --> E[Compute Instance 1] | |||
B --> F[Compute Instance 2] | |||
C --> G[Compute Instance 3] | |||
E --> H[MIG Device 0:0] | |||
F --> I[MIG Device 0:1] | |||
G --> J[MIG Device 0:2] | |||
H --> K[CUDA Workload] | |||
I --> L[CUDA Workload] | |||
J --> M[CUDA Workload] | |||
</syntaxhighlight> | |||
=== | == Workflow == | ||
= | {| class="wikitable" | ||
! Stage | |||
! Input | |||
! Output | |||
|- | |||
| Enable MIG | |||
| nvidia-smi -mig 1 | |||
| MIG Mode Enabled | |||
|- | |||
| Create GI/CI | |||
| nvidia-smi -cgi 9,19,19,19 | |||
| GPU Instances Created | |||
|- | |||
| Use MIG | |||
| [[docker]] --gpus device=MIG-UUID | |||
| Isolated GPU Access | |||
|- | |||
| Monitor | |||
| dcgmi dmon | |||
| MIG Metrics | |||
|- | |||
| Destroy | |||
| nvidia-smi -dgi | |||
| Instances Removed | |||
|} | |||
== | == Detailed Explanation == | ||
=== MIG 용어 === | |||
==== GPU Instance (GI) ==== | |||
완전히 격리된 GPU 리소스 집합 (SM + 메모리). 하나 이상의 Compute Instance를 포함할 수 있습니다. | |||
== | ==== Compute Instance (CI) ==== | ||
단일 GPU Instance 내 격리된 SM 집합. 부분 격리로 컴퓨트 리소스와 독립적인 워크로드 스케줄링을 제공합니다. | |||
==== MIG Device ==== | |||
GI + CI 조합. GPU UUID로 식별되며 `nvidia-smi -L`로 확인 가능합니다. | |||
== | ==== GPU Slice ==== | ||
가장 작은 분할 단위 — 단일 GPU 메모리 슬라이스 + 단일 GPU SM 슬라이스 조합. | |||
* GPU Memory Slice: 전체 메모리의 약 1/8 | |||
* GPU SM Slice: 전체 SM의 약 1/7 | |||
== | ==== GPU Engine ==== | ||
GPU 컨텍스트에서 독립적으로 실행되는 작업 실행기. 컴퓨트 엔진, 복사 엔진 등 다양한 엔진이 있습니다. | |||
=== MIG 장점 === | |||
* 물리적 리소스 할당 — 병렬 GPU 워크로드 격리 | |||
* 보안 멀티 테넌트 — 예측 가능한 QoS 보장 | |||
* 동적 구성 — 다양한 워크로드에 맞는 프로파일 | |||
* CUDA 프로그래밍 모델 변경 불필요 | |||
=== MIG 프로파일 === | |||
18가지 조합이 가능합니다. H100 NVL 예시: | |||
== | {| class="wikitable" | ||
< | ! Profile | ||
! Memory | |||
! SM | |||
! DEC | |||
! ENC | |||
! JPEG | |||
! OFA | |||
! Max Instances | |||
|- | |||
| MIG 1g.12gb | |||
| 10.75 GiB | |||
| 16 | |||
| 1 | |||
| 0 | |||
| 1 | |||
| 0 | |||
| 7 | |||
|- | |||
| MIG 1g.12gb+me | |||
| 10.75 GiB | |||
| 16 | |||
| 1 | |||
| 0 | |||
| 1 | |||
| 1 | |||
| 1 | |||
|- | |||
| MIG 1g.24gb | |||
| 21.62 GiB | |||
| 26 | |||
| 1 | |||
| 0 | |||
| 1 | |||
| 0 | |||
| 4 | |||
|- | |||
| MIG 2g.24gb | |||
| 21.62 GiB | |||
| 32 | |||
| 2 | |||
| 0 | |||
| 2 | |||
| 0 | |||
| 3 | |||
|- | |||
| MIG 3g.47gb | |||
| 46.38 GiB | |||
| 60 | |||
| 3 | |||
| 0 | |||
| 3 | |||
| 0 | |||
| 2 | |||
|- | |||
| MIG 4g.47gb | |||
| 46.38 GiB | |||
| 64 | |||
| 4 | |||
| 0 | |||
| 4 | |||
| 0 | |||
| 1 | |||
|- | |||
| MIG 7g.94gb | |||
| 93.12 GiB | |||
| 132 | |||
| 7 | |||
| 0 | |||
| 7 | |||
| 1 | |||
| 1 | |||
|} | |||
=== MIG 활성화 === | |||
<syntaxhighlight lang="bash"> | |||
# Persistence Mode 활성화 (필수) | |||
$ sudo nvidia-smi -pm 1 | |||
# MIG 활성화 | |||
$ sudo nvidia-smi -mig 1 | |||
# MIG 상태 확인 | |||
$ nvidia-smi --query-gpu=pci.bus_id,mig.mode.current --format=csv | |||
</syntaxhighlight> | |||
주의: "MIG mode is in pending enable state" 메시지가 나오면 `nvsm`과 `dcgm`을 중지 후 재시도: | |||
<syntaxhighlight lang="bash"> | |||
$ sudo systemctl stop nvsm | |||
$ sudo systemctl stop dcgm | |||
$ sudo nvidia-smi -i 0 -mig 1 | |||
</syntaxhighlight> | |||
=== GPU Instance 프로파일 확인 === | |||
<syntaxhighlight lang="bash"> | |||
# 사용 가능한 MIG 프로파일 확인 | |||
$ nvidia-smi mig -lgip | |||
# 배치 확인 | |||
$ nvidia-smi mig -lgipp | |||
</syntaxhighlight> | |||
== | === GPU Instance 생성 === | ||
* | <syntaxhighlight lang="bash"> | ||
* P2P | # 현재 인스턴스 확인 | ||
$ nvidia-smi mig -lgi | |||
# GPU Instance 생성 (프로파일 ID: 9, 19, 19, 19) | |||
$ sudo nvidia-smi mig -cgi 9,19,19,19 -C | |||
# 생성된 인스턴스 확인 | |||
$ sudo nvidia-smi mig -lgi | |||
</syntaxhighlight> | |||
=== MIG 디바이스 확인 === | |||
<syntaxhighlight lang="bash"> | |||
# MIG UUID 확인 (Docker에서 사용) | |||
$ nvidia-smi -L | |||
# 전체 GPU + MIG 상태 | |||
$ nvidia-smi | |||
</syntaxhighlight> | |||
=== MIG 디바이스 사용 === | |||
<syntaxhighlight lang="bash"> | |||
# UUID로 접근 | |||
$ docker run --gpus '"device=MIG-ea284e9f-1cfb-5980-8948-bc86b7c1ae71"' --rm nvidia/cuda:11.8.0-base-ubuntu20.04 nvidia-smi | |||
# GPUID:MIG DeviceID로 접근 | |||
$ docker run --gpus '"device=0:1"' --rm nvidia/cuda:11.8.0-base-ubuntu20.04 nvidia-smi | |||
</syntaxhighlight> | |||
=== GPU Instance 삭제 === | |||
<syntaxhighlight lang="bash"> | |||
# 모든 CI 및 GI 삭제 | |||
$ sudo nvidia-smi mig -dci && sudo nvidia-smi mig -dgi | |||
# 특정 GI의 CI만 삭제 | |||
$ sudo nvidia-smi mig -dci -ci 0,1,2 -gi 1 | |||
</syntaxhighlight> | |||
=== MIG 모니터링 === | |||
nvidia-smi는 MIG 디바이스 사용률 메트릭을 지원하지 않습니다 (N/A 표시). NVIDIA는 DCGM v2.0.13 이상을 권장합니다. | |||
<syntaxhighlight lang="bash"> | |||
# DCGM으로 MIG 모니터링 | |||
$ dcgmi dmon -e 203,204,1001,1002,1003,1004,1005,1009,1010,1011,1012,155 -i <GPU IDs> | |||
</syntaxhighlight> | |||
=== MIG 제한사항 === | |||
* 그래픽 컨텍스트 미지원 | |||
* P2P 미지원 ([[NVLink]] 없음) | |||
=== MIG 지원 GPU === | |||
{| class="wikitable" | {| class="wikitable" | ||
! | ! GPU | ||
! | ! CUDA Version | ||
! | ! NVIDIA Driver Version | ||
|- | |- | ||
| | | A100 / A30 | ||
| CUDA 11 | |||
| | | R525 (>= 525.53) | ||
| | |||
|- | |- | ||
| H100 / H200 | |||
| | | CUDA 12 | ||
| | | R450 (>= 450.80.02) | ||
|- | |- | ||
| | | B200 | ||
| CUDA 12 | |||
| | | R570 (>= 570.133.20) | ||
| | |||
|- | |- | ||
| | | RTX PRO 6000 Blackwell (전 버전) | ||
| CUDA 12 | |||
| | | R575 (>= 575.51.03) | ||
| | |||
|- | |- | ||
| | | RTX PRO 5000 Blackwell | ||
| | | CUDA 12 | ||
| R575 (>= 575.51.03) | |||
|} | |||
| | === NVIDIA Display Mode (Workstation GPU) === | ||
RTX PRO Blackwell 시리즈는 MIG 활성화 전 Display Mode를 Compute로 설정해야 합니다. | |||
<syntaxhighlight lang="bash"> | |||
# vBIOS 버전 확인 | |||
$ nvidia-smi --query-gpu=vbios_version --format=csv | |||
# Display Mode를 Compute로 설정 | |||
$ sudo ./DisplayModeSelector --gpumode=compute --gpu=<GPU_ID> | |||
# Graphics 모드로 복귀 | |||
$ sudo ./DisplayModeSelector --gpumode=graphics --gpu=<GPU_ID> | |||
</syntaxhighlight> | |||
RTX PRO Blackwell 최소 vBIOS 버전: | |||
{| class="wikitable" | |||
! GPU | |||
! Minimum vBIOS | |||
|- | |- | ||
| | | RTX PRO 5000 Blackwell | ||
| | | 98.02.73.00.00 | ||
|- | |- | ||
| | | RTX PRO 6000 Blackwell Workstation | ||
| | | 98.02.55.00.00 | ||
| | |- | ||
| | | RTX PRO 6000 Blackwell Max-Q | ||
| 98.02.6A.00.00 | |||
|} | |} | ||
== | 주의: 단일 카드 워크스테이션에서 primary display로 사용하는 GPU를 Compute 모드로 설정하면 물리적 디스플레이 출력이 비활성화됩니다. SSH 접근 가능 확인 후 진행. | ||
< | |||
=== MIG와 MPS 연동 === | |||
MPS(Multi-Process Service)와 MIG는 함께 작동하여 더 높은 활용률 달성 가능: | |||
1. 원하는 MIG 기하학 구성 | |||
2. `CUDA_MPS_PIPE_DIRECTORY` 설정 | |||
3. `CUDA_VISIBLE_DEVICES`로 MIG 디바이스 지정하여 애플리케이션 실행 | |||
== Configuration == | |||
<syntaxhighlight lang="bash"> | |||
# MIG 활성화 | |||
$ sudo nvidia-smi -pm 1 | |||
$ sudo nvidia-smi -mig 1 | |||
# 프로파일 확인 | |||
$ nvidia-smi mig -lgip | |||
# 인스턴스 생성 | |||
$ sudo nvidia-smi mig -cgi 9,19,19,19 -C | |||
# 인스턴스 확인 | |||
$ nvidia-smi mig -lgi | |||
# MIG 디바이스 사용 (Docker) | |||
$ docker run --gpus '"device=MIG-UUID"' --rm nvidia/cuda:11.8.0-base nvidia-smi | |||
# 모니터링 | |||
$ dcgmi dmon -e 1001,1004 -i 0 | |||
# 인스턴스 삭제 | |||
$ sudo nvidia-smi mig -dci && sudo nvidia-smi mig -dgi | |||
</syntaxhighlight> | |||
== Examples == | |||
=== Example 1: H100 NVL에서 MIG 구성 === | |||
<syntaxhighlight lang="bash"> | |||
# MIG 활성화 | |||
$ sudo nvidia-smi -pm 1 | |||
$ sudo nvidia-smi -mig 1 | |||
# 프로파일 확인 | |||
$ nvidia-smi mig -lgip | |||
# 인스턴스 생성 (3g.47gb + 3x 1g.12gb) | |||
$ sudo nvidia-smi mig -cgi 9,19,19,19 -C | |||
# 확인 | |||
$ nvidia-smi mig -lgi | |||
$ nvidia-smi -L | |||
</syntaxhighlight> | |||
=== Example 2: Docker에서 MIG 디바이스 사용 === | |||
<syntaxhighlight lang="bash"> | |||
# UUID로 접근 | |||
$ docker run --gpus '"device=MIG-45174f60-85a9-51f4-bc61-f6dc57dc60e1"' --rm nvidia/cuda:12.0 nvidia-smi | |||
# GPUID:MIG DeviceID로 접근 | |||
$ docker run --gpus '"device=0:0"' --rm nvidia/cuda:12.0 nvidia-smi | |||
</syntaxhighlight> | |||
== Best Practices == | |||
* Persistence Mode 필수 활성화 (재부팅 시 지속) | |||
* 워크로드에 맞는 MIG 프로파일 선택 | |||
* DCGM v2.0.13+ 사용 (MIG 모니터링) | |||
* 정기적인 인스턴스 정리 (미사용 인스턴스 삭제) | |||
* RTX PRO Blackwell은 Display Mode 먼저 Compute로 설정 | |||
* SSH 접근 확인 후 Display Mode 변경 (primary display GPU) | |||
* MPS 연동으로 더 높은 활용률 달성 | |||
== Limitations == | |||
* 그래픽 컨텍스트 미지원 | |||
* P2P/NVLink 미지원 | |||
* MIG 활성화/비활성화는 GPU 리셋 필요 (일회성 작업) | |||
* 인스턴스 생성/삭제는 재부팅 시 초기화 | |||
* nvidia-smi만으로는 MIG 메트릭 확인 불가 (DCGM 필요) | |||
== References == | |||
* https://docs.nvidia.com/datacenter/tesla/mig-user-guide/ | |||
* https://blogs.nvidia.com/wp-content/uploads/2020/05/MIG-table-FINAL-x1280.png | |||
* https://docs.nvidia.com/deploy/mps/index.html | |||
== Related Pages == | |||
* [[NVIDIA GPU]] | |||
* [[CUDA]] | |||
* [[NVIDIA driver]] | |||
* [[DCGM]] | |||
* [[MPS]] | |||
[[Category:Linux]] | |||
== Knowledge Graph == | |||
Related | |||
→ [[Linux]] | |||
→ [[Server]] | |||
→ [[Hardware]] | |||
→ [[Network]] | |||
[[Category:Reference]] | |||
Latest revision as of 13:53, 2 October 2026
NVIDIA MIG (Multi-Instance GPU)
Overview
NVIDIA MIG(Multi-Instance GPU)는 Ampere 아키텍처(2020)부터 도입된 기능으로, 단일 GPU를 여러 개의 완전히 격리된 가상 GPU 디바이스로 분할합니다. 각 인스턴스는 특정 애플리케이션에 할당되어 리소스 경쟁(Resource Contention)을 방지합니다.
Summary
- 무엇인가? — 단일 GPU를 여러 격리된 인스턴스로 분할
- 왜 필요한가? — 멀티 테넌트 환경에서 격리된 QoS 보장, 리소스 효율적 활용
- 언제 사용하는가? — HPC, AI/ML 멀티 테넌트, GPU 클라우드
Purpose
이 문서가 존재하는 이유
- Goal: MIG 개념, 프로파일, 구성, 모니터링, 지원 GPU 제공
- Scope: GI/CI 개념, MIG 프로파일, 활성화/비활성화, 인스턴스 생성/삭제, DCGM 모니터링
- Non-goals: CUDA 프로그래밍, MPS 통합 상세 설정은 별도 문서
Key Concepts
| Concept | Description | Related |
|---|---|---|
| GI (GPU Instance) | GPU 리소스 완전 격리 집합 (SM + 메모리) | MIG |
| CI (Compute Instance) | GI 내 부분 격리된 SM 집합 | MIG |
| MIG Device | GI + CI 조합 — UUID로 식별 | MIG |
| GPU Slice | 최소 분할 단위 (메모리 + SM) | MIG |
| MIG Profile | 18가지 조합 — 리소스 할당 패턴 | MIG |
| DCGM | DCGM 모니터링 — MIG 메트릭 | MIG |
| Persistence Mode | MIG 활성화 필수 — 재부팅 시 지속 | MIG |
| MPS | Multi-Process Service — MIG와 연동 가능 | MIG |
Architecture
MIG는 GPU 리소스를 계층적으로 분할합니다:
graph TD
    A[NVIDIA GPU] --> B[GPU Instance 1]
    A --> C[GPU Instance 2]
    A --> D[GPU Instance N]
    B --> E[Compute Instance 1]
    B --> F[Compute Instance 2]
    C --> G[Compute Instance 3]
    E --> H[MIG Device 0:0]
    F --> I[MIG Device 0:1]
    G --> J[MIG Device 0:2]
    H --> K[CUDA Workload]
    I --> L[CUDA Workload]
    J --> M[CUDA Workload]
Workflow
| Stage | Input | Output |
|---|---|---|
| Enable MIG | nvidia-smi -mig 1 | MIG Mode Enabled |
| Create GI/CI | nvidia-smi -cgi 9,19,19,19 | GPU Instances Created |
| Use MIG | docker --gpus device=MIG-UUID | Isolated GPU Access |
| Monitor | dcgmi dmon | MIG Metrics |
| Destroy | nvidia-smi -dgi | Instances Removed |
Detailed Explanation
MIG 용어
GPU Instance (GI)
완전히 격리된 GPU 리소스 집합 (SM + 메모리). 하나 이상의 Compute Instance를 포함할 수 있습니다.
Compute Instance (CI)
단일 GPU Instance 내 격리된 SM 집합. 부분 격리로 컴퓨트 리소스와 독립적인 워크로드 스케줄링을 제공합니다.
MIG Device
GI + CI 조합. GPU UUID로 식별되며 `nvidia-smi -L`로 확인 가능합니다.
GPU Slice
가장 작은 분할 단위 — 단일 GPU 메모리 슬라이스 + 단일 GPU SM 슬라이스 조합.
- GPU Memory Slice: 전체 메모리의 약 1/8
- GPU SM Slice: 전체 SM의 약 1/7
GPU Engine
GPU 컨텍스트에서 독립적으로 실행되는 작업 실행기. 컴퓨트 엔진, 복사 엔진 등 다양한 엔진이 있습니다.
MIG 장점
- 물리적 리소스 할당 — 병렬 GPU 워크로드 격리
- 보안 멀티 테넌트 — 예측 가능한 QoS 보장
- 동적 구성 — 다양한 워크로드에 맞는 프로파일
- CUDA 프로그래밍 모델 변경 불필요
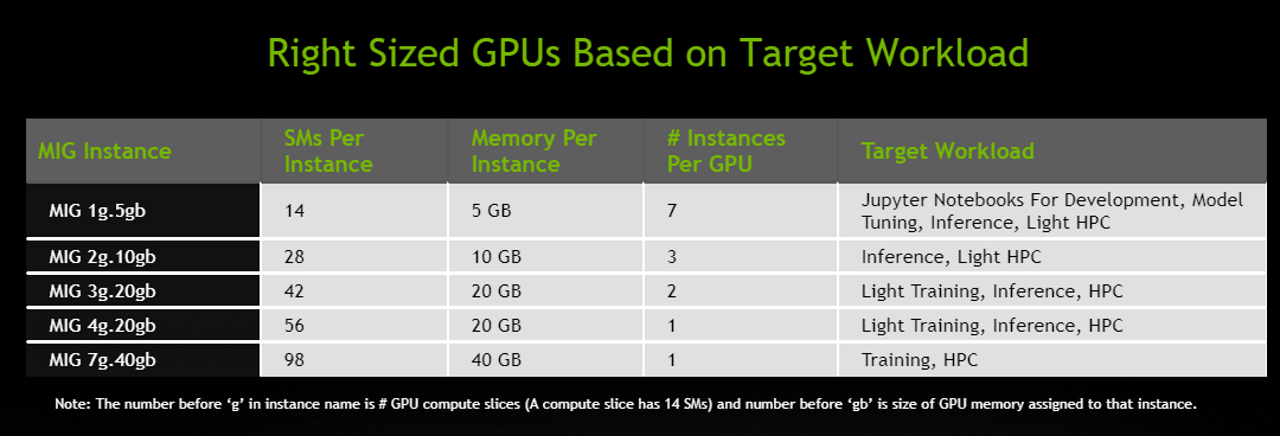
MIG 프로파일
18가지 조합이 가능합니다. H100 NVL 예시:
| Profile | Memory | SM | DEC | ENC | JPEG | OFA | Max Instances |
|---|---|---|---|---|---|---|---|
| MIG 1g.12gb | 10.75 GiB | 16 | 1 | 0 | 1 | 0 | 7 |
| MIG 1g.12gb+me | 10.75 GiB | 16 | 1 | 0 | 1 | 1 | 1 |
| MIG 1g.24gb | 21.62 GiB | 26 | 1 | 0 | 1 | 0 | 4 |
| MIG 2g.24gb | 21.62 GiB | 32 | 2 | 0 | 2 | 0 | 3 |
| MIG 3g.47gb | 46.38 GiB | 60 | 3 | 0 | 3 | 0 | 2 |
| MIG 4g.47gb | 46.38 GiB | 64 | 4 | 0 | 4 | 0 | 1 |
| MIG 7g.94gb | 93.12 GiB | 132 | 7 | 0 | 7 | 1 | 1 |
MIG 활성화
# Persistence Mode 활성화 (필수)
$ sudo nvidia-smi -pm 1

# MIG 활성화
$ sudo nvidia-smi -mig 1

# MIG 상태 확인
$ nvidia-smi --query-gpu=pci.bus_id,mig.mode.current --format=csv
주의: "MIG mode is in pending enable state" 메시지가 나오면 `nvsm`과 `dcgm`을 중지 후 재시도:
$ sudo systemctl stop nvsm
$ sudo systemctl stop dcgm
$ sudo nvidia-smi -i 0 -mig 1
GPU Instance 프로파일 확인
# 사용 가능한 MIG 프로파일 확인
$ nvidia-smi mig -lgip

# 배치 확인
$ nvidia-smi mig -lgipp
GPU Instance 생성
# 현재 인스턴스 확인
$ nvidia-smi mig -lgi

# GPU Instance 생성 (프로파일 ID: 9, 19, 19, 19)
$ sudo nvidia-smi mig -cgi 9,19,19,19 -C

# 생성된 인스턴스 확인
$ sudo nvidia-smi mig -lgi
MIG 디바이스 확인
# MIG UUID 확인 (Docker에서 사용)
$ nvidia-smi -L

# 전체 GPU + MIG 상태
$ nvidia-smi
MIG 디바이스 사용
# UUID로 접근
$ docker run --gpus '"device=MIG-ea284e9f-1cfb-5980-8948-bc86b7c1ae71"' --rm nvidia/cuda:11.8.0-base-ubuntu20.04 nvidia-smi

# GPUID:MIG DeviceID로 접근
$ docker run --gpus '"device=0:1"' --rm nvidia/cuda:11.8.0-base-ubuntu20.04 nvidia-smi
GPU Instance 삭제
# 모든 CI 및 GI 삭제
$ sudo nvidia-smi mig -dci && sudo nvidia-smi mig -dgi

# 특정 GI의 CI만 삭제
$ sudo nvidia-smi mig -dci -ci 0,1,2 -gi 1
MIG 모니터링
nvidia-smi는 MIG 디바이스 사용률 메트릭을 지원하지 않습니다 (N/A 표시). NVIDIA는 DCGM v2.0.13 이상을 권장합니다.
# DCGM으로 MIG 모니터링
$ dcgmi dmon -e 203,204,1001,1002,1003,1004,1005,1009,1010,1011,1012,155 -i <GPU IDs>
MIG 제한사항
- 그래픽 컨텍스트 미지원
- P2P 미지원 (NVLink 없음)
MIG 지원 GPU
| GPU | CUDA Version | NVIDIA Driver Version |
|---|---|---|
| A100 / A30 | CUDA 11 | R525 (>= 525.53) |
| H100 / H200 | CUDA 12 | R450 (>= 450.80.02) |
| B200 | CUDA 12 | R570 (>= 570.133.20) |
| RTX PRO 6000 Blackwell (전 버전) | CUDA 12 | R575 (>= 575.51.03) |
| RTX PRO 5000 Blackwell | CUDA 12 | R575 (>= 575.51.03) |
NVIDIA Display Mode (Workstation GPU)
RTX PRO Blackwell 시리즈는 MIG 활성화 전 Display Mode를 Compute로 설정해야 합니다.
# vBIOS 버전 확인
$ nvidia-smi --query-gpu=vbios_version --format=csv

# Display Mode를 Compute로 설정
$ sudo ./DisplayModeSelector --gpumode=compute --gpu=<GPU_ID>

# Graphics 모드로 복귀
$ sudo ./DisplayModeSelector --gpumode=graphics --gpu=<GPU_ID>
RTX PRO Blackwell 최소 vBIOS 버전:
| GPU | Minimum vBIOS |
|---|---|
| RTX PRO 5000 Blackwell | 98.02.73.00.00 |
| RTX PRO 6000 Blackwell Workstation | 98.02.55.00.00 |
| RTX PRO 6000 Blackwell Max-Q | 98.02.6A.00.00 |
주의: 단일 카드 워크스테이션에서 primary display로 사용하는 GPU를 Compute 모드로 설정하면 물리적 디스플레이 출력이 비활성화됩니다. SSH 접근 가능 확인 후 진행.
MIG와 MPS 연동
MPS(Multi-Process Service)와 MIG는 함께 작동하여 더 높은 활용률 달성 가능:
1. 원하는 MIG 기하학 구성 2. `CUDA_MPS_PIPE_DIRECTORY` 설정 3. `CUDA_VISIBLE_DEVICES`로 MIG 디바이스 지정하여 애플리케이션 실행
Configuration
# MIG 활성화
$ sudo nvidia-smi -pm 1
$ sudo nvidia-smi -mig 1

# 프로파일 확인
$ nvidia-smi mig -lgip

# 인스턴스 생성
$ sudo nvidia-smi mig -cgi 9,19,19,19 -C

# 인스턴스 확인
$ nvidia-smi mig -lgi

# MIG 디바이스 사용 (Docker)
$ docker run --gpus '"device=MIG-UUID"' --rm nvidia/cuda:11.8.0-base nvidia-smi

# 모니터링
$ dcgmi dmon -e 1001,1004 -i 0

# 인스턴스 삭제
$ sudo nvidia-smi mig -dci && sudo nvidia-smi mig -dgi
Examples
Example 1: H100 NVL에서 MIG 구성
# MIG 활성화
$ sudo nvidia-smi -pm 1
$ sudo nvidia-smi -mig 1

# 프로파일 확인
$ nvidia-smi mig -lgip

# 인스턴스 생성 (3g.47gb + 3x 1g.12gb)
$ sudo nvidia-smi mig -cgi 9,19,19,19 -C

# 확인
$ nvidia-smi mig -lgi
$ nvidia-smi -L
Example 2: Docker에서 MIG 디바이스 사용
# UUID로 접근
$ docker run --gpus '"device=MIG-45174f60-85a9-51f4-bc61-f6dc57dc60e1"' --rm nvidia/cuda:12.0 nvidia-smi

# GPUID:MIG DeviceID로 접근
$ docker run --gpus '"device=0:0"' --rm nvidia/cuda:12.0 nvidia-smi
Best Practices
- Persistence Mode 필수 활성화 (재부팅 시 지속)
- 워크로드에 맞는 MIG 프로파일 선택
- DCGM v2.0.13+ 사용 (MIG 모니터링)
- 정기적인 인스턴스 정리 (미사용 인스턴스 삭제)
- RTX PRO Blackwell은 Display Mode 먼저 Compute로 설정
- SSH 접근 확인 후 Display Mode 변경 (primary display GPU)
- MPS 연동으로 더 높은 활용률 달성
Limitations
- 그래픽 컨텍스트 미지원
- P2P/NVLink 미지원
- MIG 활성화/비활성화는 GPU 리셋 필요 (일회성 작업)
- 인스턴스 생성/삭제는 재부팅 시 초기화
- nvidia-smi만으로는 MIG 메트릭 확인 불가 (DCGM 필요)
References
- https://docs.nvidia.com/datacenter/tesla/mig-user-guide/
- https://docs.nvidia.com/deploy/mps/index.html
Related Pages
Knowledge Graph
Related